Full frame off resto

Terry

Member
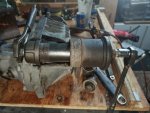
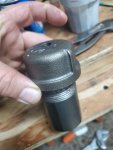
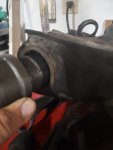
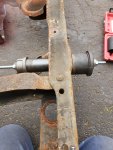
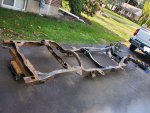
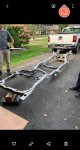
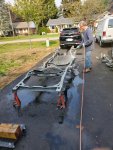
I though I had a picture of the setup on a lower arm but nope. Sorry.
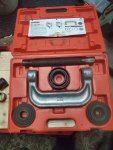
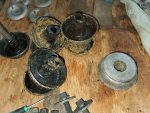
Anyways when I said rent, I really mean - crappy tire, go to the auto parts desk and loan tools for free. You give you visa number and they give you few days, if after two weeks you don't bring back, they charge your card and its yours.

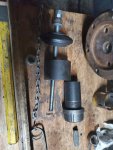
So I took advantage of "free" and got all the adaptors that went with the press. Glad I did, it was those I used most.

Yes, large sockets would also worked well and I do have a 3/4 drive set at the office but decided to use the loaner method. I didn't want to subject an expensive socket to that abuse.
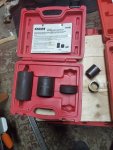
 

Attachments

  • 20201002_212715.jpg
    20201002_212715.jpg
    2.8 MB · Views: 22
  • 20201002_215723.jpg
    20201002_215723.jpg
    2 MB · Views: 22
  • 20201002_210146.jpg
    20201002_210146.jpg
    1.6 MB · Views: 21
  • 20201002_210130.jpg
    20201002_210130.jpg
    1.6 MB · Views: 21

Terry

Member
Ok. I'm sure everyone gets the process but I snapped a few more pictures of the shop made. I have components of the rented kit on one end and the inch and quarter pipe nipple.and cap on the other. Its the perfect size to push the rubber out. The 3/8 rod, nuts and washers do wear our quick so if preforming this operation, have a handful
 

Attachments

  • 20201003_004403.jpg
    20201003_004403.jpg
    1.9 MB · Views: 14
  • 20201003_004406.jpg
    20201003_004406.jpg
    1.7 MB · Views: 14
  • 20201003_004438.jpg
    20201003_004438.jpg
    1.3 MB · Views: 14
  • 20201003_004557.jpg
    20201003_004557.jpg
    2.2 MB · Views: 14
  • 20201002_172605.jpg
    20201002_172605.jpg
    1.6 MB · Views: 14

Terry

Member
And yet more pictures. Case you were wondering what a $280 ball joint press is worth. Actually well made tool and would have been much easier to use had there been another set of hands. Bench vise didn't quite cut it.
 

Attachments

  • 20201003_010318.jpg
    20201003_010318.jpg
    2.1 MB · Views: 9
  • 20201003_010324.jpg
    20201003_010324.jpg
    2 MB · Views: 9

Terry

Member
I ment to say "what a $280 dollar press kit looks like". The 2 short pieces of 1 inch pipe.between the sets are .my ear spacers.
 

DaveP's Ghost

Well-known member
Replace the front differential side axle shaft seals while it is out. The driver side seal is the one that usually leaks. To remove the axle: Gently load up the flange with a pry bar to push it outwards. Give the flange a good whack with a dead-blow or 5-pounder. It should pop out with the first blow if it is pre-loaded with the pry-bar. The axles are retained with an internal snap-ring that comes out with the axle.
 

wildphil

I Love My Ty's
I wish that I had known that trick for removing the axle before now Dave. It took me a little while when I pulled my axles.
 

Terry

Member
Today is Saturday, on Tuesday the truck heads to the blasters. Not sure how long it actually takes but I would like to have it back Friday morning. If I can, I'm planning on taking Friday off to pickup, wash, prep and finally por-15 the whole lot.

Thankyou for the tip about removing the front axle. Somewhere along the line, the vent tube for the front diff got cut off short. The thing is probably so full of crap and road grit it needs full disassemble and rebuild. The seals are probably done as very little gear oil came out when draining.
 

Attachments

  • 20201003_125452.jpg
    20201003_125452.jpg
    2.2 MB · Views: 13
  • 20201002_210146.jpg
    20201002_210146.jpg
    1.6 MB · Views: 13
  • 20201003_152033.jpg
    20201003_152033.jpg
    2.7 MB · Views: 13

Terry

Member
Well, nothing else comes off this. I did cut off a few welded on mounts for the exhaust system (added long after factory) and ground smooth. The shiny areas are from a flap disk were I removed factory weld splatter. I guess next time I work on these parts, the truck will be going back together.

I still have to aquire the brakes and rear axle from 98-02 Blazer. This will have to be the next step in the process. Sooner I get that, the sooner can have rebuilt along with the front diff and get this back on its wheels.

T
 

Attachments

  • 20201003_180808.jpg
    20201003_180808.jpg
    4.1 MB · Views: 27
  • 20201003_152036.jpg
    20201003_152036.jpg
    2.5 MB · Views: 24

Terry

Member
Oh yeah, totally forgot about this. (See Picture)

The topic of the odometer reading and when the TY packed it in was of huge debate back in the day. (666)

I always looked at it this way..I'm Canadian and use kilometers. I dont know what a mile is, Everything's metric. Ok I do but still, to me the truck has 107K

I'm older now, much more experienced and wise. I think my feelings on this topic have changed. Call me crazy but think I'm going to hook the speedo cable to my cordless drill and roll the odometer over to 66700 just to be safe before I begin assembly.
 

Attachments

  • 20180817_194007.jpg
    20180817_194007.jpg
    2 MB · Views: 12

DaveP's Ghost

Well-known member
There have been a few blown front diffs over the years. I feel the failures are caused by lack of lube from bad seals, OR: The V-clutch locks solid and the truck is continued to be driven and the front diff fails (the pinion gear strips its teeth off) because it is much weaker than the rear diff. These front diffs are tricky to "rebuild". Special tools and know-how are required. I would check the ring and pinion backlash by hand-feel. If the pinion rocks more than about 3/16-1/4" the gear set is too worn and should be replaced. I would try to find a used unit from a 4X4 (4X4 spend most of their life in 2WD so the front diffs don't get a lot of miles on them) and swap your AWD RH tube and axle shaft to it. Cheaper and better than a "rebuild". You need 3.42 Ratio, which is common.

Call me crazy but think I'm going to hook the speedo cable to my cordless drill and roll the odometer over to 66700 just to be safe before I begin assembly.
Ok, you're crazy. And you can't do it. The odometer is electric. No mechanical cable to connect yer drill to.

It's cool to see someone undertaking a frame-off on one of these now. There were a lot of them back in the day (I've done 2 myself in the 98-2000 time frame), but not so much any longer. It's a labor of love for a keeper, not something that adds enough value to resale to make it economically viable.
 
Last edited:

Terry

Member
Monday and Tuesday this week.

Its Thanksgiving this weekend in the great white north, so we'll be out in the shop drinking and painting!

I haven't actually seen the frame yet with my own eyes, old Dad says they did a good job. Place called Whitby Monument. Cost me $350 for frame and a ton of parts that go with it.

T
 

Attachments

  • 623604003.jpg
    623604003.jpg
    314.3 KB · Views: 22
  • Screenshot_20201007-212303_Gallery.jpg
    Screenshot_20201007-212303_Gallery.jpg
    1 MB · Views: 24

Terry

Member
Dam phone rang early this morning, so was up and out with my little man to go work on the truck earlier then normal

Had 2 goals to accomplish today.

1. Degrease, wash and etch (metal prep) the frame
2. Get body onto the rotisserie. Not sure if I mentioned before, but I've acquired the use of one.

1. Of couse, the weather calling for rain today. Rolled frame out onto a large tarp and used the por-15 de-greaser in spray bottles. Wow, this stuff works amazing. Not only was the frame quite clean after washing with varsol but was thoroughly sand blasted too and you could see the oils running off (wasn't sand as we used compressed air to blow off.)
Next we wash all the cleaner off and once dried, used spray bottles to coat frame with the por-15 metal prep etcher. Instructions indicate to keep the surface "wetted" for 15-20 mins. After that, we rinsed off and let dry. Its suggested to leave frame to dry over night so thats the plan.

2. Dad already had the ass end on the rotisserie but the front was a bit more difficult. This did prove to be nerve racking as this unit is home made and not as stable as I hoped. I'm not 100% on this thing so I might just make a new one.


T.
 

Attachments

  • 20201010_220525.jpg
    20201010_220525.jpg
    4.8 MB · Views: 29
  • 20201010_130104.jpg
    20201010_130104.jpg
    3.3 MB · Views: 34
  • 20201010_121045.jpg
    20201010_121045.jpg
    2.2 MB · Views: 32
  • 20201010_144126.jpg
    20201010_144126.jpg
    2 MB · Views: 40
  • 20201010_144142.jpg
    20201010_144142.jpg
    3.3 MB · Views: 37

Terry

Member
Not working on the truck today. Just too dam tired. Been very busy at work lately with the cooler weather coming.

However, did manage to get a coat of paint on the frame. Man she looks good. Did see a.truck on this fro

Purchased replacement floor pans the other night along with a petty fancy Jegs bubble flare forming tool. This way I can just make my own brake and fuel lines out of Stainless.

Also been sandblasting the metal components of the body mounts getting them ready for por-15. I suppose they are comming out ok.

T
 

Attachments

  • IMG_2441.jpg
    IMG_2441.jpg
    320 KB · Views: 34
  • 20201017_101859.jpg
    20201017_101859.jpg
    3.8 MB · Views: 33
  • 20201017_101832.jpg
    20201017_101832.jpg
    4.3 MB · Views: 32

Terry

Member
Lol, just wanted to see if anyone was paying attention. I do like to do that from time to time. Indeed they are double flare and I mainly purchased the tool because most of the flares I do are on copper or aluminum tubing and a double is difficult. Stainless would be almost impossible with the tools I currently own.
 
DaveP's Ghost,

I have been reading some of your posts on this site, sounds like you really know your shit. Do You have any pictures of your past and/or present trucks on here? Would love to check out.
T
 

DaveP's Ghost

Well-known member
Nope, no pictures. I deleted my photobucket account a couple of years before PB did the grey-out thing. I used DaveP for a long time, although I deleted thousands of my posts, there are still some posts under that name.

There's a thread titled "DesertSy, its just a driver." That was a rebuild of a totally worn out but complete and rust-free Syclone I found locally in 2010. Took a couple of years to finish it, I drove it 15,000 miles in 3 more years and sold it to an enthusiast in Connecticut in 2016. I never heard anything again about that truck. #2144, I keep expecting to see it pop up on BaT.

I currently have a wht/gry 93 Ty that has been under my care since 1997, and became mine in 2011. I have a Syclone I purchased in 2000 as a bad fire-job that shouldn't have been resurrected, but I bought it anyway, and spent too much money ($24,000 2004 dollars) on it doing a full nut and bolt frame off. As of 2004, it was running and drivable, but I've never finished the cladding or details. I've run it around the block a few times. I think I've added less than 5 miles to it in 16 years.

Stay on your project. Keep making progress. Keep posting here, it will encourage you to keep going. I found keeping my DesertSy build thread current and updated helped to keep me motivated to finish the project.
 

Terry

Member
Thanks for the support guys! Im glad a few of you enjoy following the progress and possibly some of my ramblings.

DaveP's Ghost (DPG) Impressive. Too bad most of your content is gone, would love to have seen pictures of your collection, you've had as many as I've seen total. Never offered for sale in Canada makes these trucks very rare in Southern Ontario,(highest population density) only seen 2 of em other then mine.


1.
Many years ago, I used to do the HVAC service at a GMC dealership in whitby (10 mins from my place) The owner purchased and imported a brand new 92 black Ty. Gus has long since passed away.. dont know where his TY ended up

2.
There was another in town here few years ago. Was a mint condition and exceptionally clean black 93. I believe came from R.I. with less then 25 thou on the clock.
The guy went away one weekend and his 16 yr old kid found the keys for it. Totalled the truck. What a shame.

Make it 3,
I drove down to a bedroom community outside Manhattan to purchase a Black 92. Pictures looked good. Talked over the phone to the owner and sounded good. ($13500US)
However, in-person was a different story. Deceiving camera angles and non disclosure of engine fuckery. I walked. Nowadays that wouldn't faze me but back then, it was all the money I had.

Back to mine,
She now has two full coats of por-15 on frame and suspension. Looks really good. Thanks Dad!
Still trying to source as 2000ish blazer for brakes, found a parts truck for $600 but too far away. Local wreckers have a couple but I can't convince them to remove the parts for me, I have to do it. Dam work is crazy busy and there's not enough hours in the day.

Sorry guys, all wind and no pictures this time of the truck progress. I did however find an old but not very good picture the the 66 chev Dad and I built. 1/2 ton. 2 wheel drive with 4x4 box and factory inset step. Hard wood and stainless box floor. 402 BB with 4 bolt mains, mild cam, forged rod n pistons. Camaro front clip. Factory trailing arms with rear coils. 373 posi with 17" billet alum wheels. (Big at the time). All metal except the cab shell was replaced with rust free southern metal. Box from TX, hood from UT etc. This truck was originally manufactured at the truck plant in our home town of oshawa. Unfortunately he sold it years ago. It was simple but cool as shit.

T
 

Attachments

  • 20200530_113443.jpg
    20200530_113443.jpg
    1.6 MB · Views: 12
Top